Getting Started
Use this page as the first-run checklist for the current StepWorks workflow.
1. Sign In And Open The Correct Workspace
Open the editor workspace
Choose the right organization before you create or edit anything.
- Go to https://app.stepworks.fr.
- Sign in or create an account.
- In the top bar, open the organization switcher.
- Select the organization you want to work in.
- If that organization gives you Editor access, continue on Products.
- If that organization gives you Viewer access only, StepWorks opens the viewer-side product list instead.
If you belong to both Viewer Demo Org and ACME Assembly, choose ACME Assembly before you start product setup. Otherwise you may land in the viewer workflow instead of the editor workflow.
You are on the Products page and ready to create or open a product.
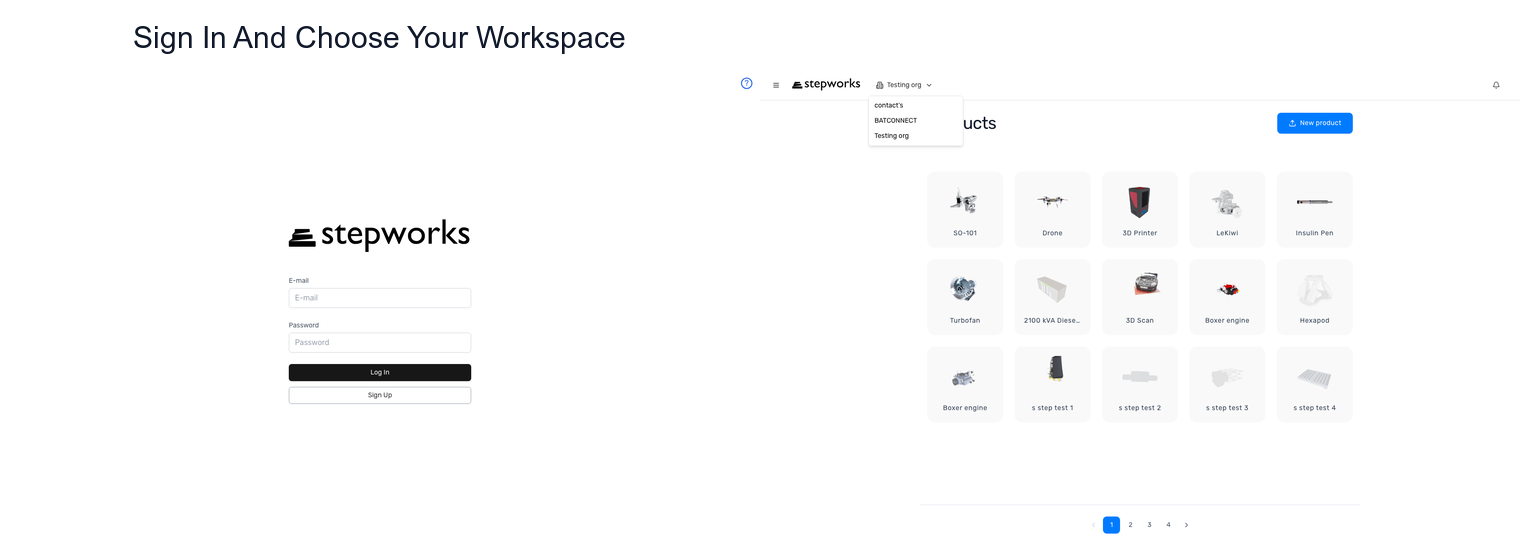
Sign in first, then confirm that you are inside the correct organization before you start product setup.
2. Create Your First Product
Create a product with a model and optional manuals
A product is the container for the 3D model, instruction documents, procedures, publishing settings, and QR workflows.
- Open Products.
- Click New Product.
- Enter a Product Name.
- Turn on 3D model if this product needs a Product Twin.
- Upload the model file. The current UI accepts
OBJ,FBX,GLB,GLTF,USDZ,USD,USDA,STP(beta), andSTEP(beta). - Turn on Instructions if you want AI-assisted procedure generation.
- Upload one or more instruction files in
PDFformat. - Click Create.
- Wait for processing to finish before opening the product.
Create Cordless Drill X200, upload drill.glb, and attach x200-service-manual.pdf. This gives you both a Product Twin workflow and document-based procedure generation later.
The product appears in Products and becomes ready after processing completes.
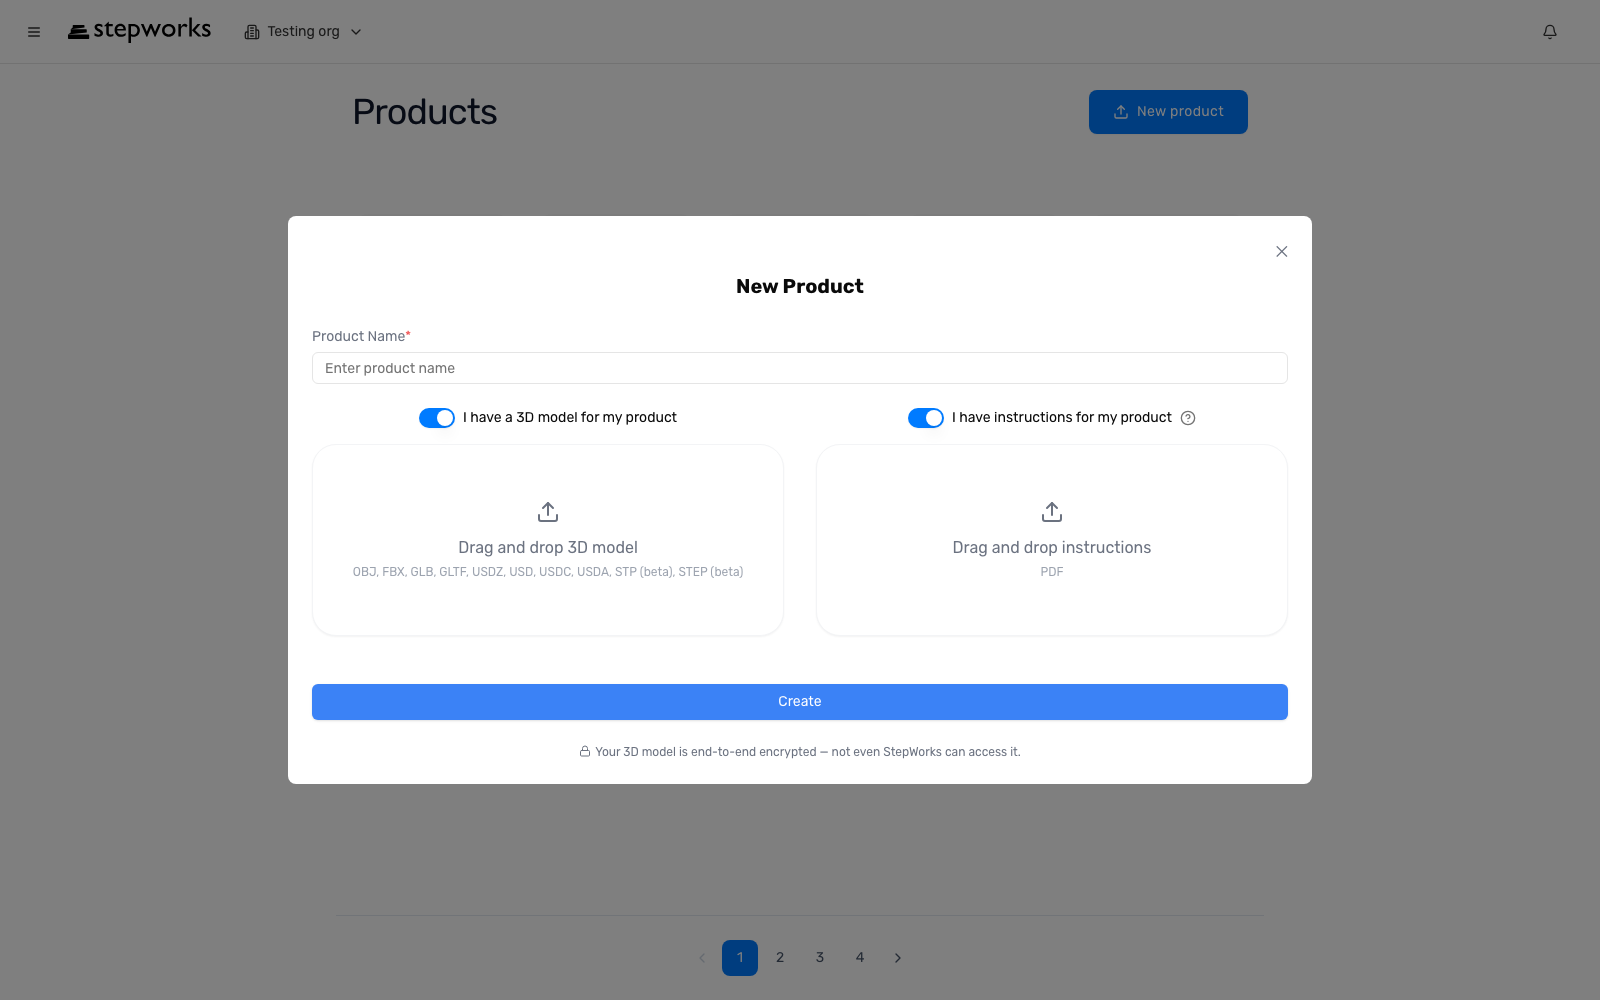
The New Product modal combines the product name, 3D model upload, instruction upload, and Create action.
3. Open Product Home
Use Product Home as the control center
Product Home is the handoff point between model setup, documents, procedures, publishing, and QR settings.
- Open the product from Products.
- Use Product Twin when you need to prepare the 3D model.
- Use Product Document when you need to add or replace manuals.
- Use Publish Settings when you need to choose public/private procedures, languages, reporting, or branding.
- Use Product Settings when you need viewer links, QR codes, or serial-number workflows.
- Use the procedures table at the bottom when you need to create or edit procedures.
If the 3D model is ready but the PDF manual is missing, go to Product Document first. If the manual is already in place and you want a first draft procedure, stay in the procedures table instead.
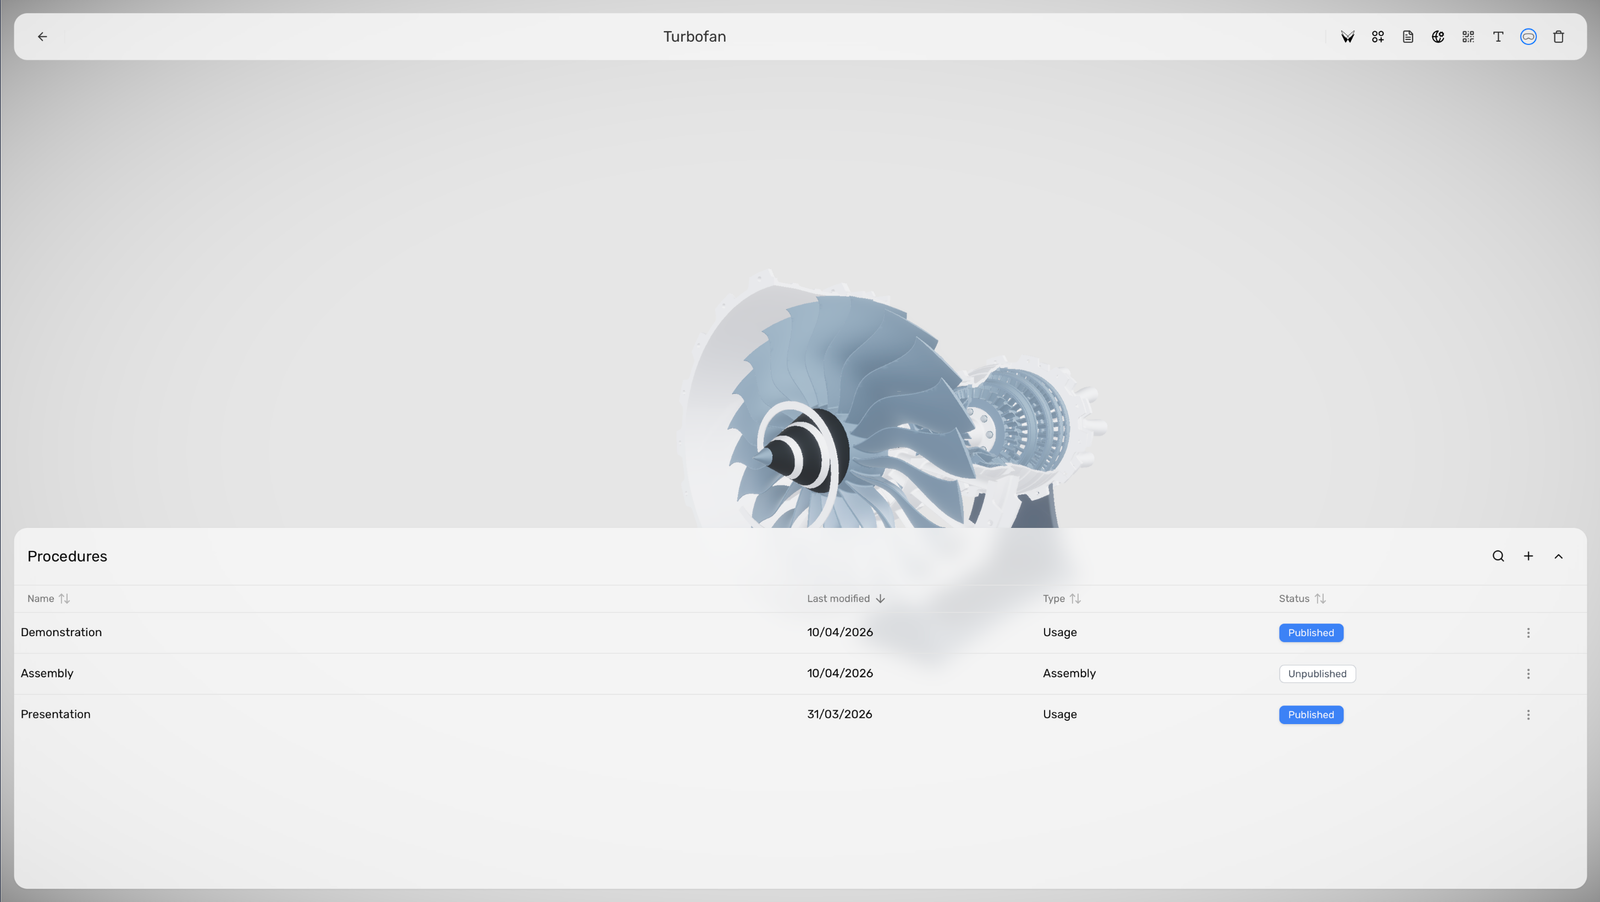
Product Home combines the top action bar, the 3D product view, and the procedures table.
4. Prepare The Product Twin
Set up the 3D model for procedure authoring
Reference names are optional. What matters most is that the Product Twin behaves like the real object before you start authoring procedures.
- In Product Home, click Product Twin.
- Select an important part in the hierarchy.
- Set a Reference Name only if the default part name is not clear enough.
- Add a Store Link if viewers may need to reorder or replace that part.
- Create or edit the part states you need so the Product Twin behaves like the real object.
- Save your changes before returning to Product Home.
Rename a part from Part_27 to Battery Cover, add a store link to the spare part page, and create an Open state if the cover needs to move during the procedure.
Your procedures can now reference clearer parts, and a realistic Product Twin will help generation a lot.
The top action bar includes Product Twin.
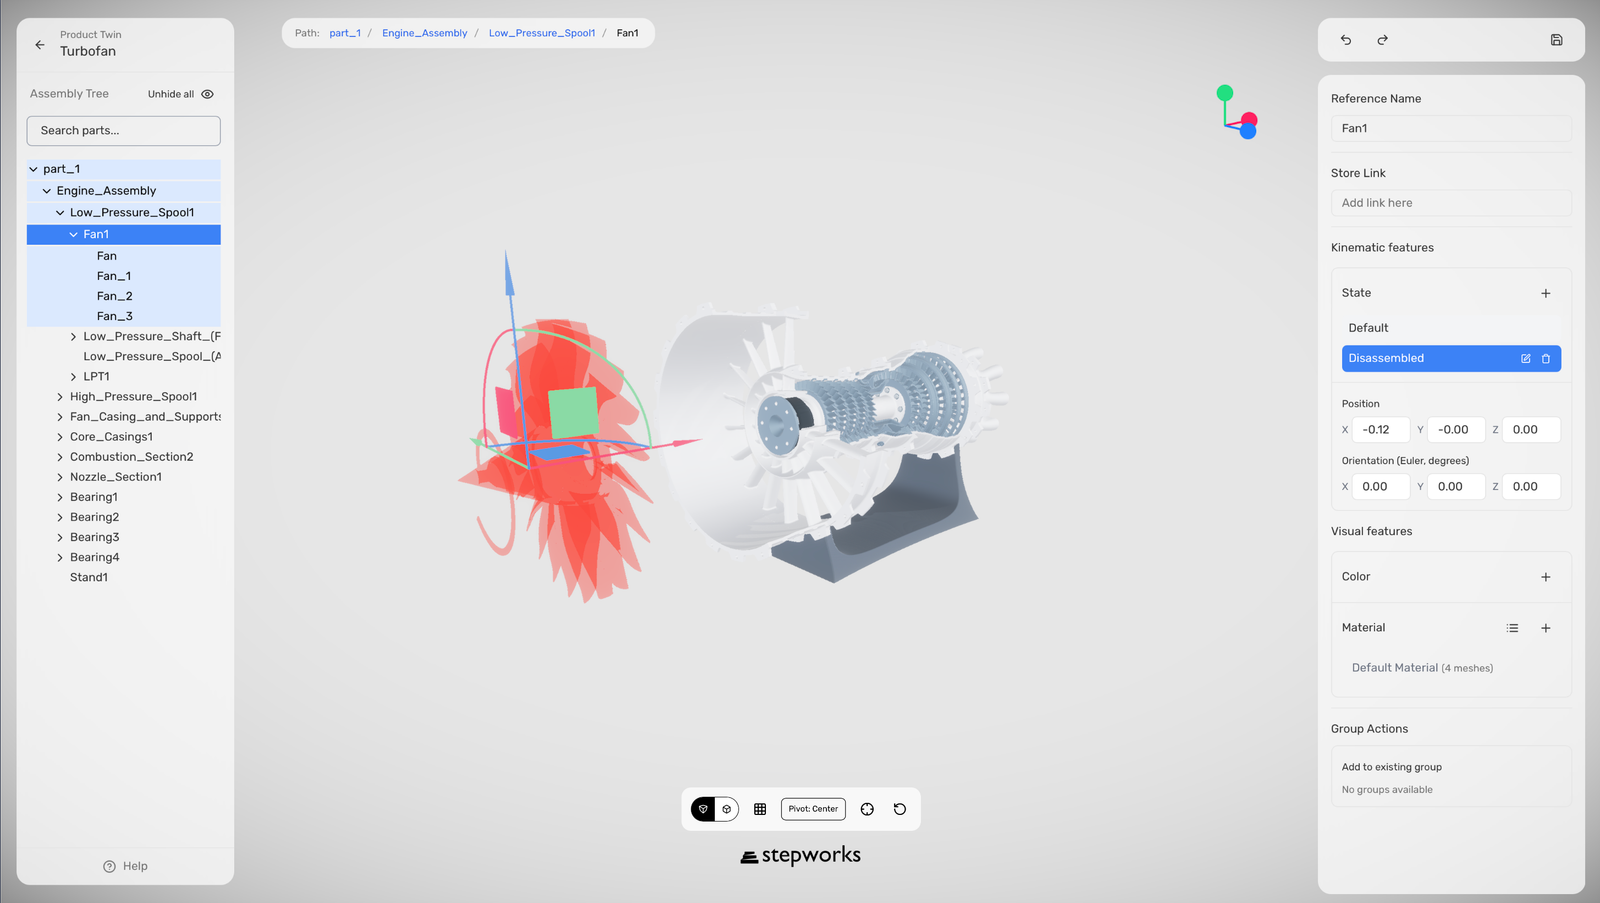
The Product Twin editor shows the part hierarchy on the left and the inspector for names, links, and states on the right.
5. Create Procedures
Create one procedure
Use Single procedure when you want one procedure only, whether it is blank or generated.
- In the procedures table, click Create procedure.
- Choose Single procedure.
- Enter a Procedure Name.
- Choose the Type.
- Choose the authoring Language.
- Use Create for a blank procedure.
- Use Generate if the product already has instruction documents.
- If you want to generate from video, turn on Add video, upload the video, and then click Generate.
Create Replace Air Filter, choose Maintenance, choose English, and click Generate if the product already has the maintenance PDF.
The procedure appears in the table. Generated procedures may stay in Pending while StepWorks finishes the draft.
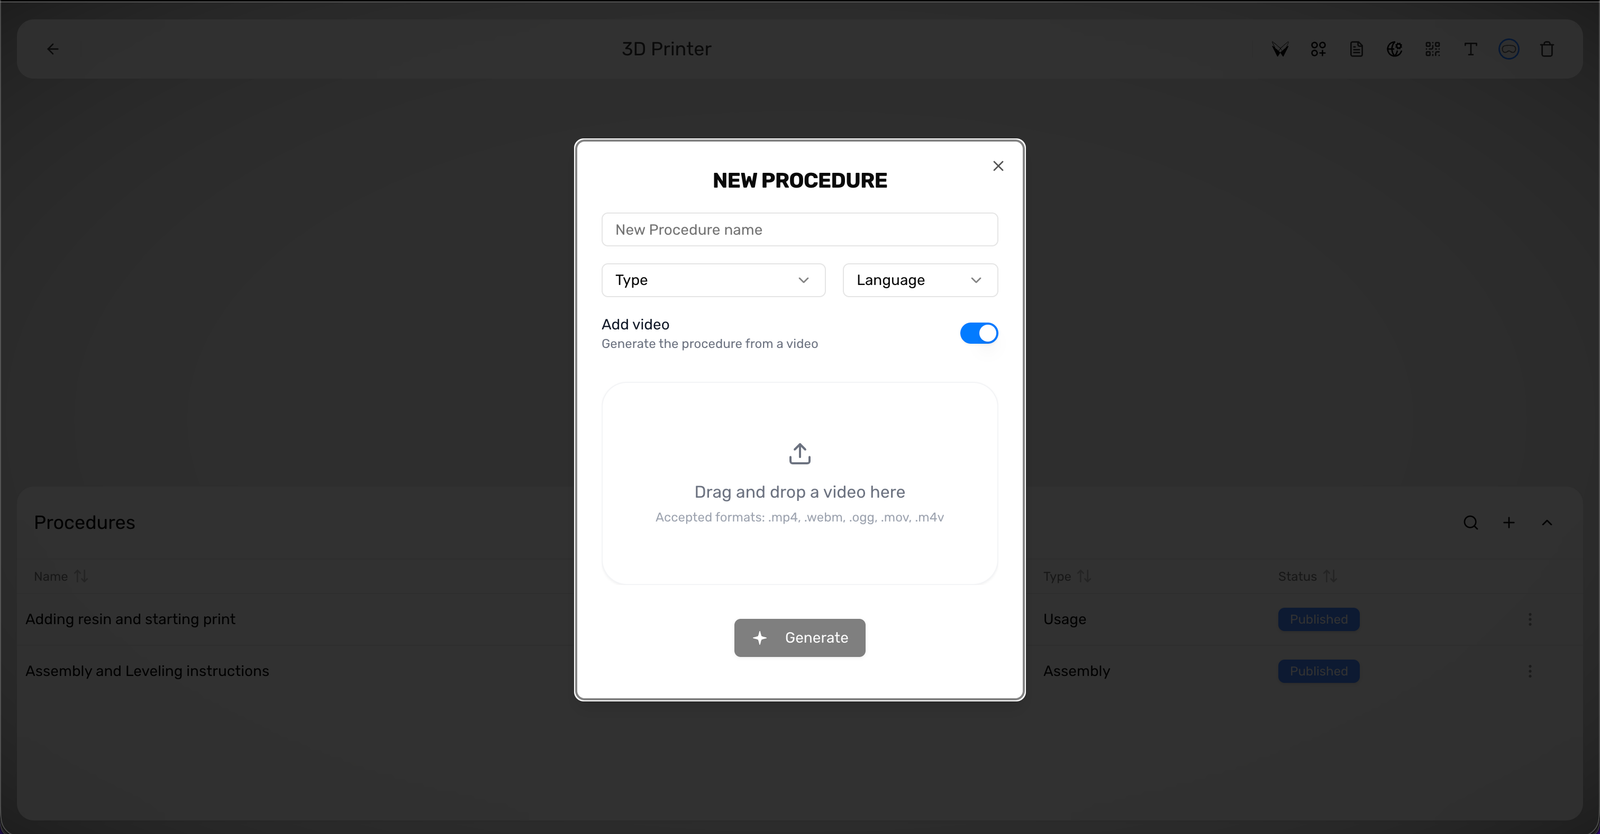
The Single procedure dialog includes Procedure Name, Type, Language, Add video, Create, and Generate.
Create several procedures from manuals
Use Batch create when you want several procedure drafts from the product documents.
- In the procedures table, click Create procedure.
- Choose Batch create.
- Wait for StepWorks to analyze the product documents.
- Review the suggested procedure titles and types.
- Edit or remove any suggestion that is not useful.
- Click Generate Procedures.
A product manual may produce suggestions such as Install battery, Charge battery, and Replace battery. Remove any suggestion that does not belong in the final workflow before you generate them.
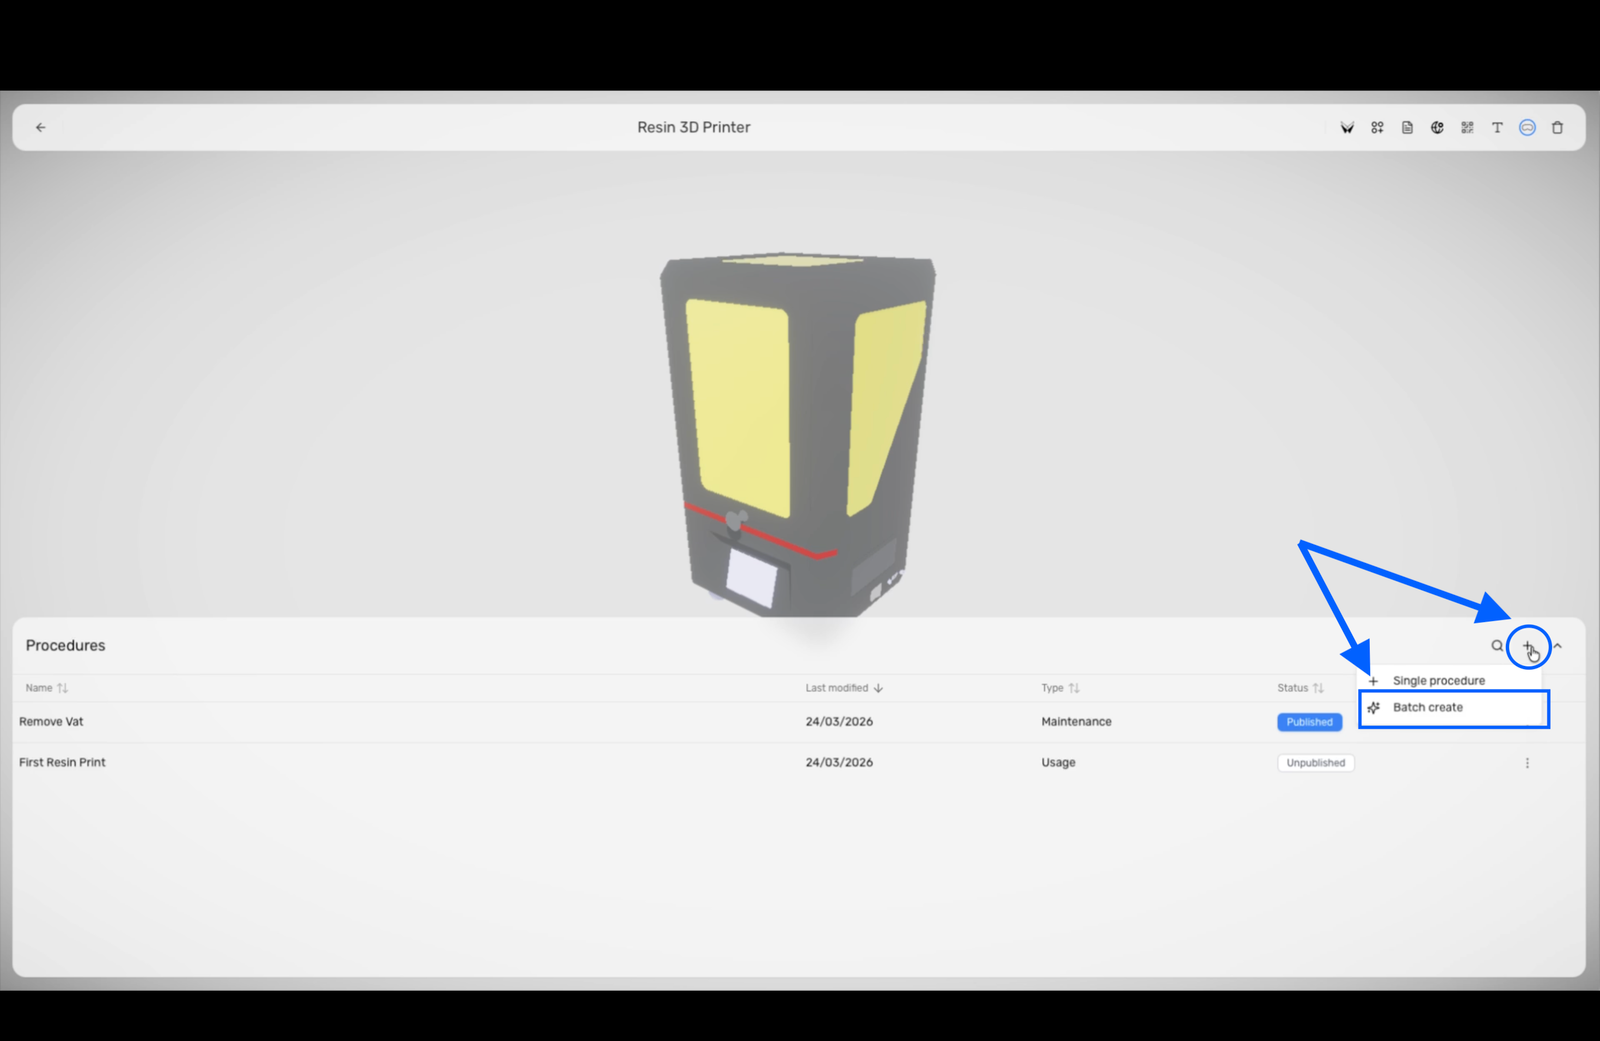
The Suggested Procedures dialog includes editable titles and types plus the Generate Procedures action.
6. Publish And Share
Quick publish from the Procedure Editor
Use the quick publish flow when you only need to expose one procedure.
- Open the procedure from the procedures table.
- In the editor header, click Publishing.
- Turn on Public, Private, or both.
- Save the publish change.
- If the procedure is published, use Share to copy a link or download a QR code where your plan allows it.
If Replace Air Filter should only be used internally, turn on Private only and leave Public off.
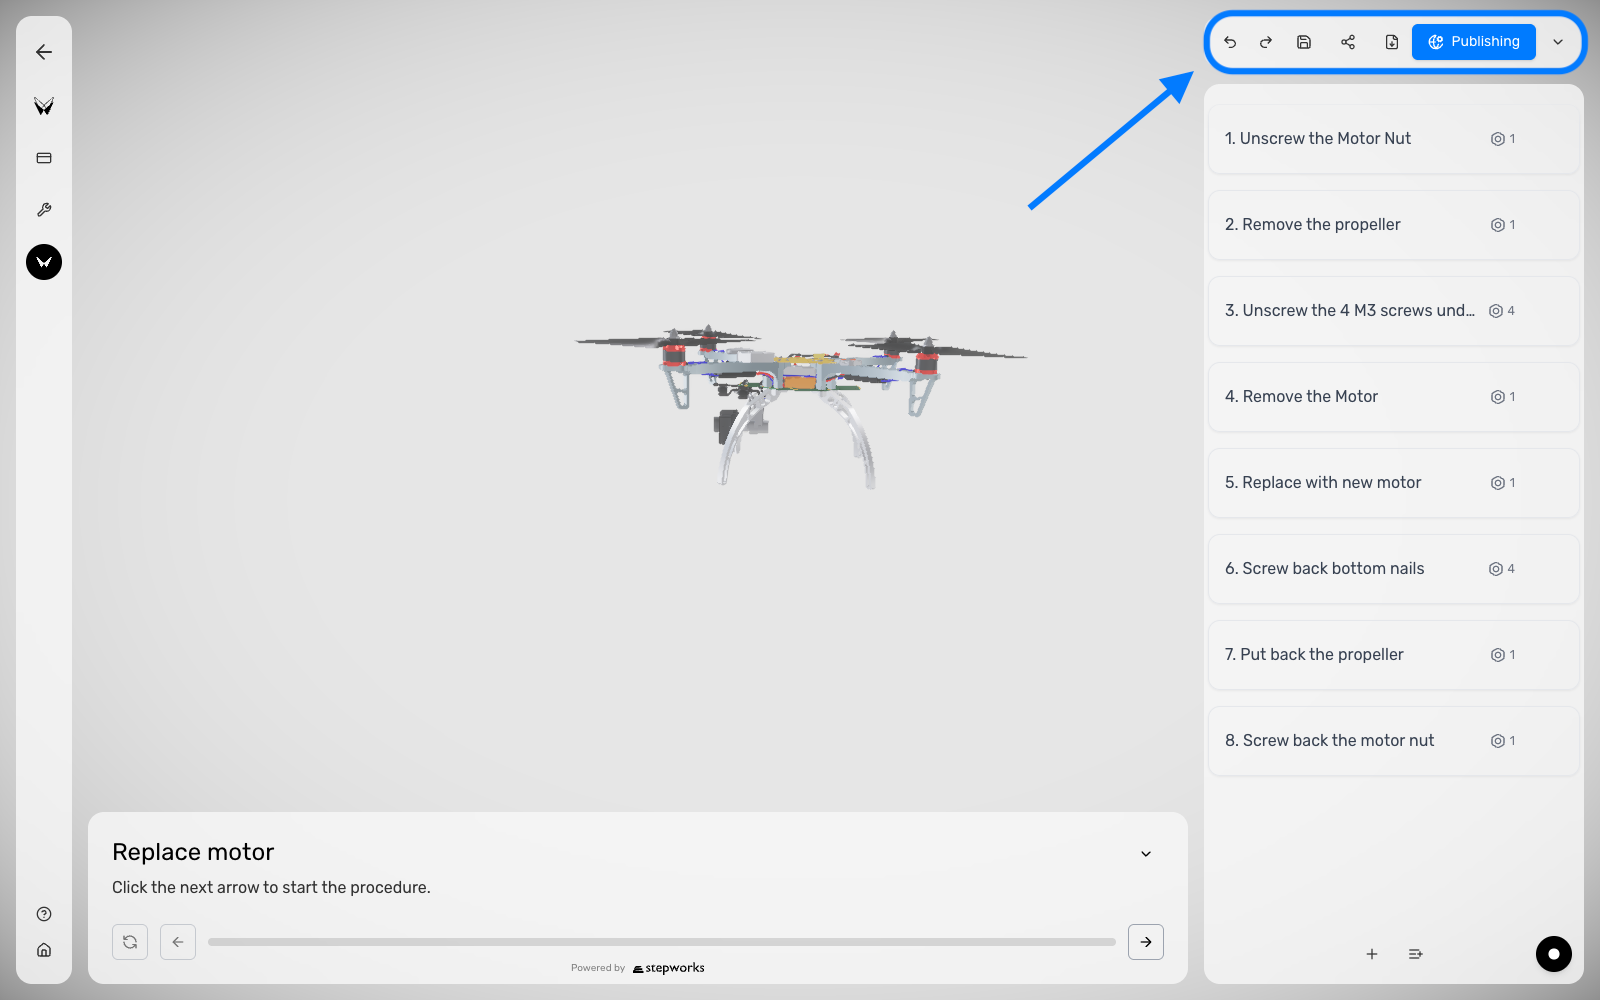
The Procedure Editor keeps save, publishing, share, and export actions in the top bar next to the 3D view.
Use Publish Settings for product-level publishing
Use the full page when you also need languages, reporting, branding, or a controlled public/private procedure list.
- Go back to Product Home.
- Click Publish Settings.
- Open the Public or Private tab.
- Choose which procedures should be available in that tab.
- Update languages and viewer options if needed.
- Click Save.
Publish Install Battery publicly in English and French, but keep Replace Internal Fuse private with reporting enabled.
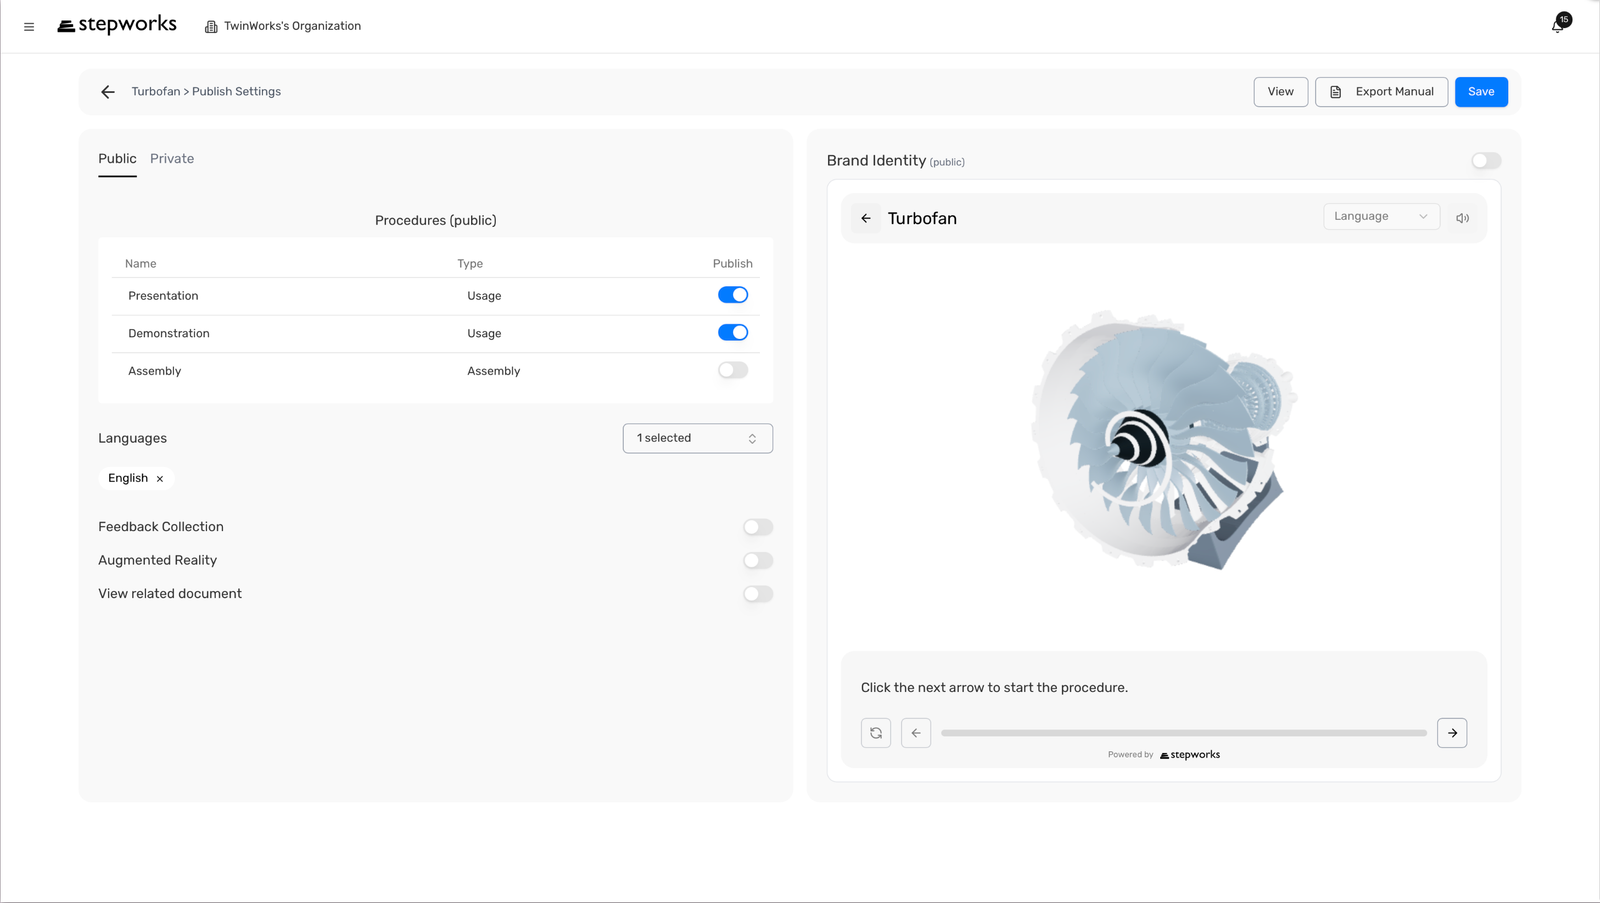
Publish Settings keeps the Public and Private tabs, the procedure list, viewer options, and Save on one screen.
7. Use Product Settings For QR And Serial Workflows
Prepare a viewer link or QR code
Product Settings is for product-level sharing, QR download, serial registration, and serial-number-based viewing.
- In Product Home, click Product Settings.
- Choose Public or Private.
- Copy the product viewer link if you need a direct URL.
- Download the product QR code if you need a scannable entry point.
- Import or generate serial numbers if each unit needs its own QR workflow.
- Export the ZIP of serial-specific QR codes once the serial list is ready.
If 200 physical units need unique traceability, generate or import serial numbers first, then export the ZIP of serial-specific QR codes.
Each serial-specific QR opens the same product viewer with the serial number already embedded in the URL. Reporting and report history can then stay attached to that exact physical unit.
The top action bar includes Product Settings.
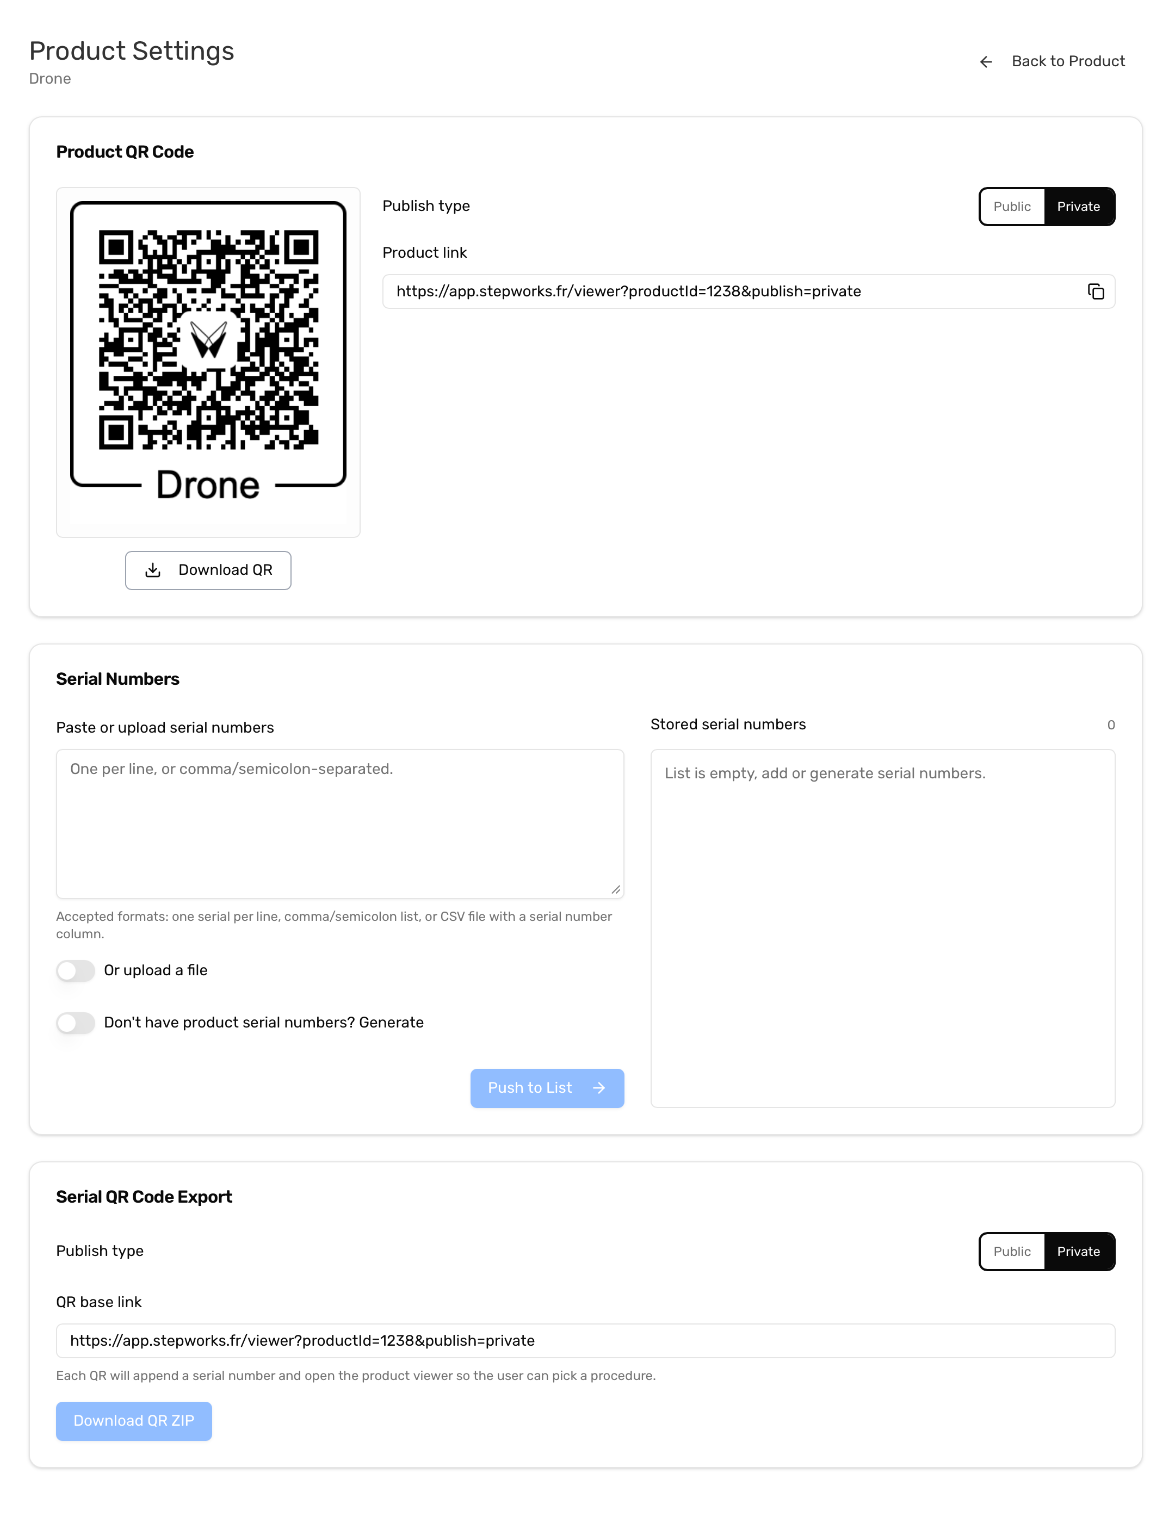
Product Settings combines the product QR, viewer link, serial-number registration, and serial-specific QR export tools.
8. Keep The Workspace Running
After publishing:
- Use Organization to manage members and export templates.
- Use Dashboard to review product and procedure analytics.